Getting Started
SUPERLOCK PRO ADMIN
Overview
Users
Adding Users
Editing Users
Removing Users
Duplicating Users
Client Preferences
Text Items
Invalid Logins
Username
Screen Saver
SUPERLOCK PRO CLIENT
Overview
Logging In
Tips
Registering SuperLock Pro
Uninstalling SuperLock Pro
Frequently Asked Questions
Contacting TriVectus
Technical Information
Credits

Getting Started
This section is designed to get you started using SuperLock Pro quickly. It guides you through changing the name and password of the default super-admin user, adding an admin user, and adding a normal user. Before reading this section, you should have read the Introduction so that you're familiar with the three different levels of users and the three parts of SuperLock Pro.
To begin, open SuperLock 4.5 Pro Admin (Admin) from your Control Panels folder. Because this is the first time it has been run and there are no users, you will not be asked to login. In the future, login will be required. When you open Admin, the following window will appear:

The list on the left is the users list. Notice that a single user named Master has been created and is selected. This is the super-admin user. If you were to quit and relaunch Admin at this point, you would be required to use this username to log in (the password is master). Click the Edit User button. The following window will appear:
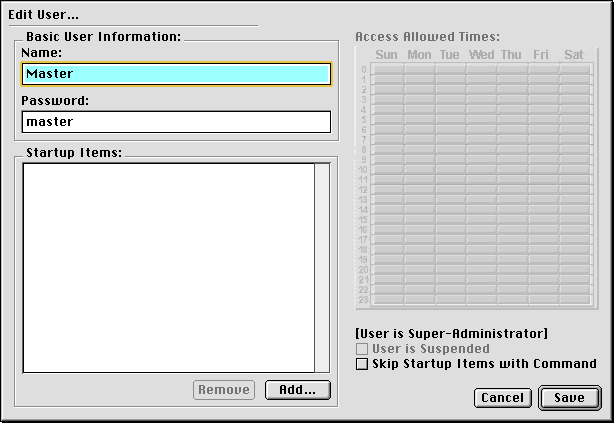
This is the Edit User dialog. The first thing you want to do is change the name to your own. To do this, edit the text in the Name field in the top left. After you finish editing the username, press the tab key or use the mouse to move the insertion point to the Password field, and edit it as you wish. When you have the username and password that you want entered into the fields, click the Save button to exit back to the main window.
Now we'll add an admin user. Click the New User button; the New User dialog will appear, which operates exactly like the Edit User dialog above.
Begin by filling in a name and password as you did when editing the super-admin user. Then, because we're adding an admin user, turn on the User is Administrator check box. This will allow the user to log into Admin and edit Normal users. Finally, use the mouse to click on the boxes in the Access Allowed times area that correspond to the times the user is allowed to log in. For instance, if the user is allowed to log in from 09:00 to 17:00 (9 AM to 5 PM) Monday thru Friday, press on the box at coordinates (Mon, 09) and drag out a rectangle down to the opposite corner at (Fri, 17). At this point the dialog should look similar to this one:
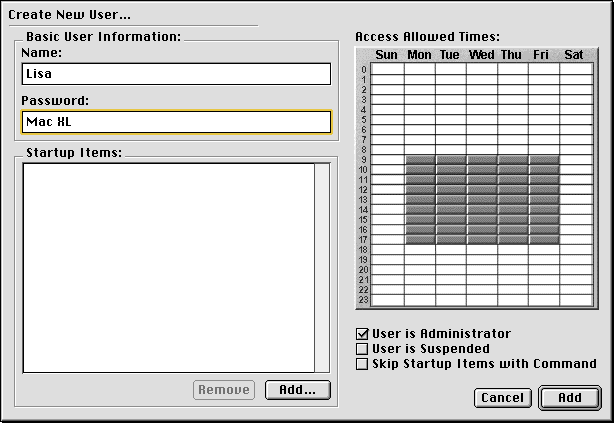
When you're finished, click Add, and you'll be returned to the main window. Notice the new user in the user list.
Finally, add a normal user. Click the New User button once again and follow the instructions from the previous two paragraphs, except don't check the User is Administrator check box.
When you're all finished, close Admin. Now you can try out each of the different logins by choosing SuperLock 4.5 Pro Client (Client) from the Apple menu. You can also verify the admin status of each user by attempting to use their usernames to log into Admin.